
FormAssembly is a great tool, but there are a couple of out-of-the-box limitations that can be circumvented through a bit of code. A common issue nonprofits face when using FormAssembly is event or program registration. Often, codes are provided for discounted or free tickets. A few codes can be managed with a calculated field, but this gets cumbersome if there are a number of different codes. The second issue that FormAssembly struggles to manage without code is hiding payment details when the ticket or registration is free. Fields can be conditionally shown or hidden based on picklist or checkbox selections, but not based on calculated or text fields.
Luckily, both of these issues can be remedied with javascript. FormAssembly provides the ability to add javascript to a form, but doesn’t provide technical support for code you’ve written or much guidance.
Although the code may look intimidating, I have attempted to break it down in a way that it can be used by anyone comfortable working with FormAssembly and writing/reading some basic formula calculations—even if you have no coding experience.
Caveats:
- As mentioned before, FormAssembly won’t troubleshoot custom code. Here’s the help article: https://help.formassembly.com/help/custom-javascript
- It’s possible to disable javascript in a browser, which is not common but can lead to issues if you’re relying on it. Some options are found in the above FormAssembly link.
- I do not have a coding background! I have gone through a lot of trial and error attempting to put these sorts of scripts together, and I’m sure someone with more experience could write the code in a more elegant manner.
Getting Started
The first thing you’ll need is a FormAssembly text field to capture the discount code value. You will probably also want to also create a custom field on the Opportunity object so that you can pass this value into Salesforce and report on it.
If you have a simple payment calculation and only one code, you might be able to avoid writing a separate function. If this is the case, your setup would look something like this:
- Discount Code field as a variable “discountCode”
- Ticket quantity picklist as a variable “tickets”
- Optional: hidden fields to store price (variable “price”, the valid code (“code”), and discount percent (“discount”; set as a decimal value 0-1). You can simply enter the values you’d like in the total amount formula below, but I recommend using hidden fields and setting them as variables. This makes the form much easier to adjust down the road—rather than parsing through formulas, simply update the values of the hidden fields.
- Total Amount calculated field:
- tickets*price*if(discountCode==“code”){discount}else{1}
The total amount field is the number of tickets (selected by the person filling the form out) times the price (hidden field with a value determined by FA admin). It’s then multiplied by an if statement; when the user-entered discount code matches the hidden code field set by an admin, it returns the value of the discount (other hidden field). So a discount percent of .8 would take 20% off the total transaction. If the codes don’t match, multiply by 1 (aka do nothing).
This is a fine situation for a single code, but what if you have 10 codes and want some to provide a 10% discount, some a 20% discount, some $20 off, and some to waive the fee entirely? This is where a separate javascript function makes it much easier to manage multiple codes and various values.
You use the “code” tab of the “properties” section of your form to add code, and the nifty part is that you can reference that code in your calculated fields. This gives you a lot more space to work with. Let’s take a look at what the code looks like and then break it down.
Code:
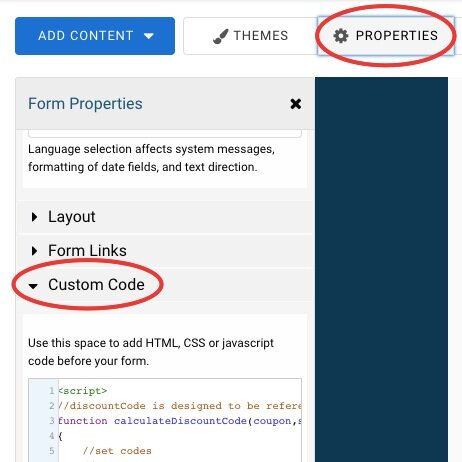
Add it into this section of your form
Let’s assume the subtotal is $25 (passed in as just the number 25) and the discount code “ten2” is entered.
<script>
You’ll need to put <script> prior to the start of your code, and finish it off with </script>.
//calculateDiscountCode is designed to be referenced in a FormAssembly calculated field
I won’t get too far into code commenting or style—just know that two slashes remove the following text from the actual code and are used to make comments. My example is probably over-commented but I don’t write a lot of code so it’s helpful to really break it down as a reminder for my future self or anyone else reading what I’ve written.
function discountCode(coupon,subtotal){. . .}
This function is called discountCode and accepts two values. If I wasn’t concerned with codes covering both percent discounts and dollar-value discounts, I could simplify this a little bit and input only the code, return a decimal between 0-1, then multiply the function by the subtotal in a calculated total amount field. In this case, though, I’d like to have the function handle all the math and simply return a total amount.
//this section is for percentage off codes
var free = ['free123','free456','free789'];
var percent10 = ['ten1','ten2','ten3'];
var percent20 = ['twenty','twenty1','twenty2'];
//this section is for dollar-value codes
var dollars20 = ['dollarcode1', 'dollarcode2'];
var dollars25 = ['dollarcode3', 'dollarcode4'];
This should make some sense—it defines various tiers of discounts. It’s pretty easy to add or remove codes from each section and you can use as many as you’d like, because it’s defined simply as a list. It’s important to make sure that you surround each code with single quotes, and use commas to separate the values. If you have a lot of codes to input, you can use a spreadsheet to format them. Important for non-coders: note the semicolons after each variable definition!
//set default values to no discount
var amount = subtotal;
var coupon = coupon;
var percentDiscount = 1;
var dollarDiscount = 0;
This section sets up the default values. The variable “amount” is set as the subtotal passed into the function. The percent and dollar value discounts are set to no discount.
//adjust percentdiscount variable if the coupon code entered matches
if(free.includes(coupon)){percentDiscount=0}
else{if(percent10.includes(coupon)){percentDiscount=.9}
else{if(percent20.includes(coupon)){percentDiscount=.8}
}
};
This section uses a series of nested if statements to check whether the code entered on the form matches any values in the list of discount codes. If it does, it reassigns the value of percentdiscount. So if the discount code “ten2” is entered, the first criteria doesn’t match, but the second one does—so percentdiscount is set to .9.
//adjust dollar-value variable if the coupon code entered matches
if(dollars20.includes(coupon)){dollarDiscount=20}
else{if(dollars25.includes(coupon)){dollarDiscount=25}
};
This section reviews the dollar-value discount lists, and reassigns a value if there’s a match. In the example above, if “ten2” was entered there’s no match so dollardiscount stays at zero.
var totalAmount = amount*percentDiscount-dollarDiscount;
//ensure non-negative total
if(totalAmount < 0){totalAmount = 0};
return totalAmount;
This is where it all comes together—“return” specifies that the result of this formula is what the function sends back out, in this case to our FormAssembly total field. The amount is the subtotal of 25, percentdiscount was adjusted to .9 based on the code, and dollardiscount remains the default value of 0; so 25*.9-0 = 22.50. The if statement beforehand ensures that a negative value won’t be returned if a dollar discount exceeds the subtotal.
Referencing the function in a calculated field
Now that we have a function that can calculate the correctly discounted total, how can we go about passing field values into and out of the function? This is actually really easy, and mimics the structure outlined above when a single code was used in a calculated field (no javascript) with a few modifications:
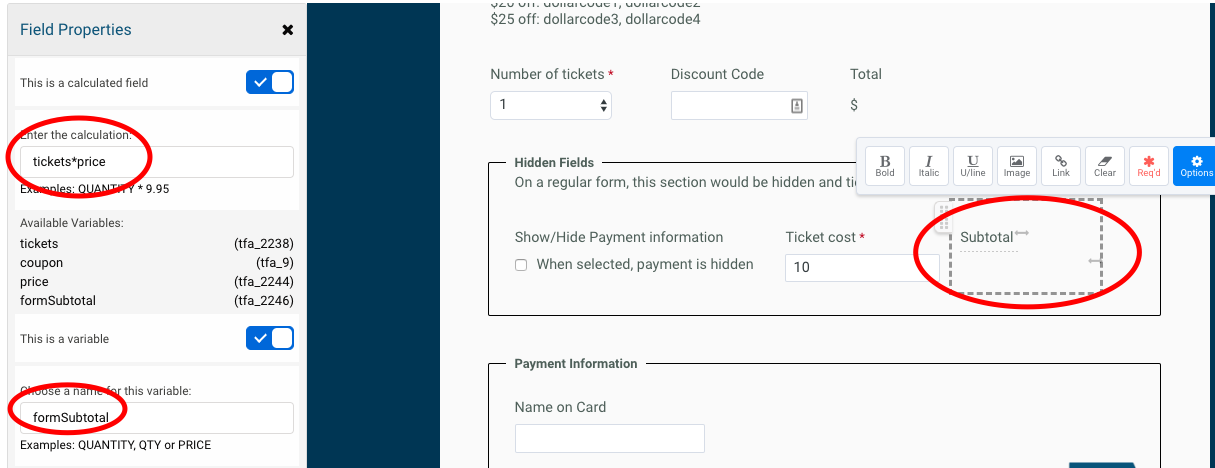
Subtotal Calculation
- Discount Code FA field as a variable “discountCode”
- Ticket quantity picklist as a variable “tickets”
- Ticket price as a variable “price”
- Subtotal field as a variable “formSubtotal” is a calculated field; tickets*price
- Total Amount calculated field; this is where we’ll use the discountCode function, into which we’ll pass two values—the coupon code and the subtotal. I’ve used the variable name formSubtotal to clarify that the FormAssembly field formSubtotal is being passed into the javascript argument subtotal, but the two aren’t the same thing. Sort of confusing, yes.
So the total amount field should be calculated using the formula we’ve written:
calculateDiscountCode(discountCode,formSubtotal)
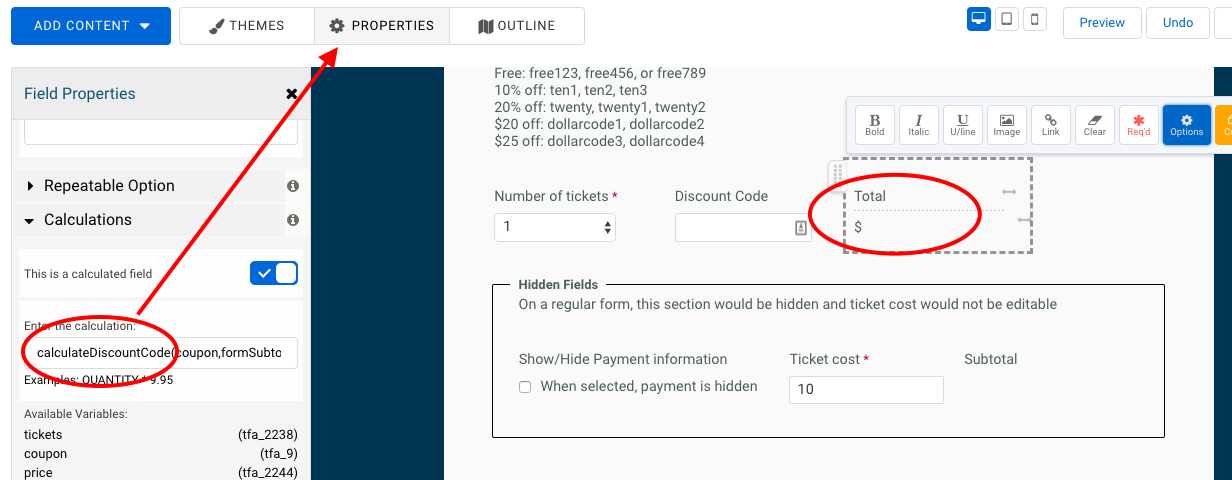
The total amount is a calculated field that calls on the function calculateDiscountCode, which “lives” in the Properties section of the form. It passes into the function two FormAssembly variables, '“coupon” and “formSubtotal""
If all of your codes still return a positive value and you don’t need to hide payment details for free ticketing, you’re all set. Details on how to hide payment details if a code could be entered resulting in a zero-dollar amount up next.
Conditional Payments
Set Up a Conditional Rule in FormAssembly
Within the FormAssembly user interface, it’s pretty easy to hide a field, fieldset, or group based on the value of a picklist or checkbox. This makes it simple to hide the payments section of your form, removing the need for anyone to enter card information. The key is getting a snippet of javascript to make a change to that field and then letting FormAssembly control the visibility of your other fields. We’ll start by creating a checkbox and a conditional rule, then get into the javascript. More on this in a bit, but it’s critical that you use a checkbox rather than a picklist for this part.
Sidenote: when using conditional rules to hide fields (unlike setting field visibility to ‘Hidden’) FormAssembly treats those fields as if they aren’t there. You can run into problems if you’re hiding payment fields and sending a non-zero total to your payment connector. There are some workarounds using formula fields, but that’s beyond the scope of this post. Just keep in mind: if you modify this technique to hide payment information and pass a non-zero value into your payment connector, there might be some additional problems to troubleshoot.
Step 1: Create your controlling field
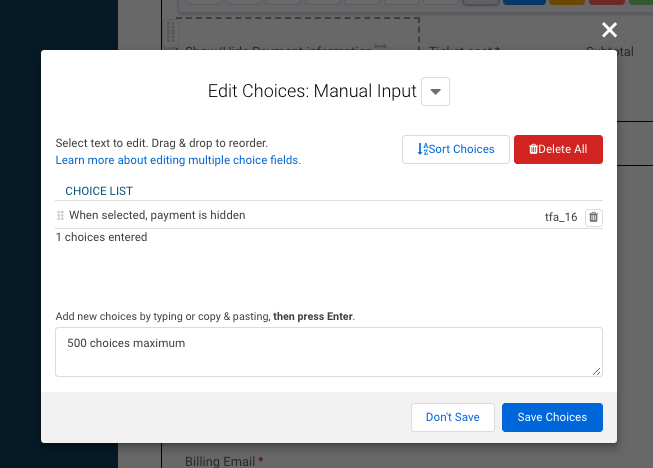
Create a checkbox with a single choice, and name it appropriately. You’ll use javascript to toggle this choice back and forth between true and false.
Note that the field Id of this specific choice is tfa_16; more on that later.
Step 2: Set up a conditional rule
For the purposes of this demo, the checkbox controlling whether the payment section is visible remains exposed. In your own forms, use Access Control to hide this part.
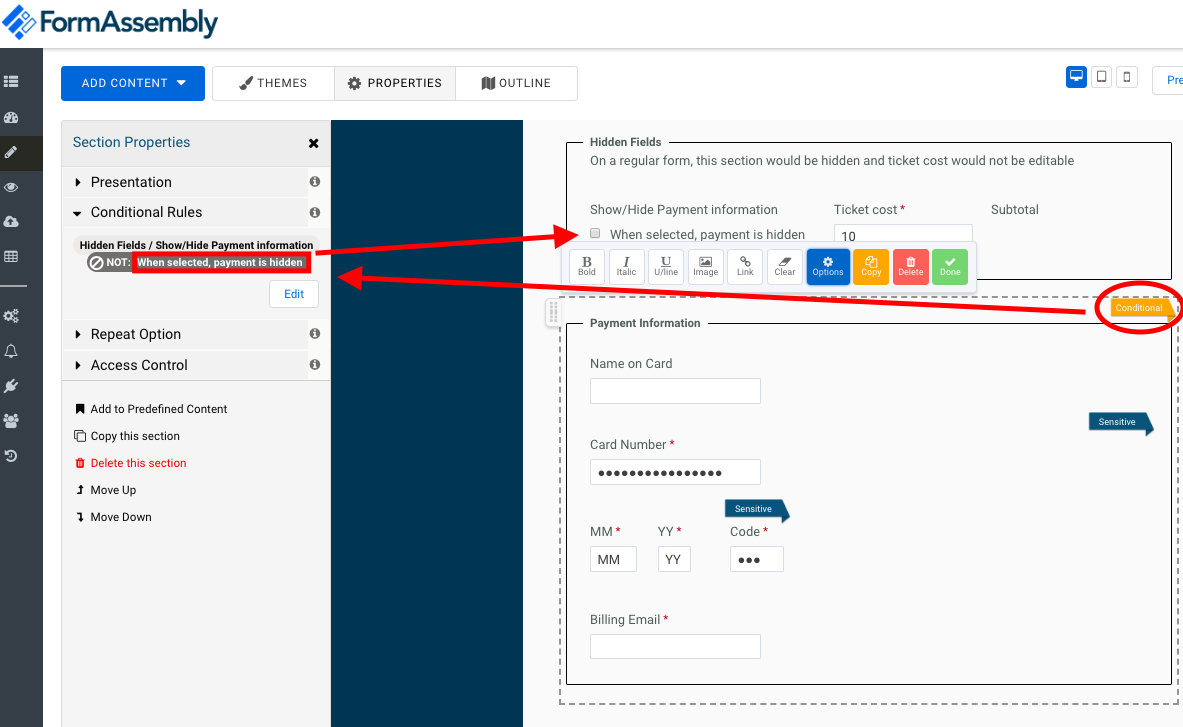
Setting up your conditional rules
Understanding HTML Elements
A key concept to understand, at least generally, is that the javascript you’re writing doesn’t really understand what’s going on behind the scenes with FormAssembly. It can figure out what field on a form you’re referring to, but you have to tell it this explicitly using .getElementbyId.
The second concept to be aware of is that webpage code doesn’t simply all load instantly at once. There’s an order of operations, and if your javascript that’s looking for an element fires before the form has loaded (i.e., before the element exists) you may run into an error.
The third concept is that javascript only runs when you tell it to. In the code used in this demo form, FormAssembly manages when it runs so you don’t need to worry about this, but I’m also going to cover (briefly) how you could manage the show/hide trick strictly based on interaction with form elements and not within a function.
Here’s the completed code:
You may be able to note the difference between this and the previous post—it comes right before the return:
//find the checkbox element and proceed if it exists
var checkboxValue = document.getElementById('tfa_16');
if(checkboxValue){if(totalAmount == 0){checkboxValue.checked=false;}
else{checkboxValue.checked=true;}
//use the "click" function so FormAssembly knows it's changed
//this simulates a mouse click (i.e. reverses the previous true/false values) which is why they are reversed
checkboxValue.click();
}
The first step creates a new variable ‘checkboxValue’ and uses .getElementById to match this new javascript variable to the FormAssembly value. This is how code “knows" what field to read and modify. To figure out the Id of that specific element, you can either look at that choice value within FormAssembly (mentioned above), or look at the actual form in viewer mode and use the Chrome “Inspect” feature (right-click that element) to view metadata. This is a handy technique for all sorts of form debugging, passing parameters into the form via the url, etc.
Important: You will need to find the Id of that specific choice, not the field that contains all the different choices. This is easier to manage in FormAssembly but still helpful to understand using Inspect. For reference, in my form the field of choices is ‘tfa_15’ while the actual choice value we care about is ‘tfa_16’:

The form, open in view mode and using Inspect. Note that tfa_15 is the set of choices, while tfa_16 is the actual choice that needs to be toggled on/off.
The next IF statement:
if(checkboxValue){
…is key. This ensures the code was able to find the ‘tfa_16’ element. If/when the code runs prior to the form completely loading and checkboxValue hasn’t been defined, the code will skip the following steps rather than returning an error. Once the page is loaded, each time the code runs (which is handled by FormAssembly because you’re already using the function calculateDiscountCode() within the form), it will successfully find ‘tfa_16’ and execute the rest of the if() statement.
Let’s look at the next part:
if(totalAmount == 0) {checkboxValue.checked=false;}
else {checkboxValue.checked=true;}
//use the "click" function so FormAssembly knows it's changed
//this simulates a mouse click (i.e. reverses the previous true/false values) which is why they are reversed
checkboxValue.click();
The nested if() statement should be pretty easy to follow, except for the fact that the true/false values are reversed. And what’s going on with .click()?
The answer is that even if you use javascript to update the value of a field, FormAssembly won’t realize the field has been changed unless there’s an explicit user interaction. Without that ‘.click()’ in your code, you’ll see the value of the checkbox change but the conditional rule won’t fire. This is the reason it’s so important to use a checkbox rather than a picklist—there’s not a good way to programmatically “announce” an interaction with a picklist, but “.click()” is an event that FormAssembly can hear and react to.
This is also the reason the true/false values are reversed when setting up your rules. The first step is to set the wrong value, then use .click() to change it in a way that FormAssembly can understand.
Here’s the form again:
A Note On User Experience
It would be great to have a button “Apply Discount Code” to trigger the javascript… but that’s an easy tradeoff to accept when considering the power FormAssembly has when interacting with Salesforce data over another tool or custom-built webform.
Discount codes in FormAssembly are clunky on both the back end and the front end, but we put up with it because of all the other benefits.
Event Listeners and More Advanced Element Interactions
Ok, so all of this works great but what if you aren’t using a javascript function to calculate your total and need interactions with the page alone to control a conditional rule? You could use the code above, but a faster way might be to set the amount to zero using a calculation within FormAssembly and then a smaller bit of javascript to hide the payment section. Another example would be a non-payment related section you wished to hide based on the value of another text field.
I’m not going to go too in-depth on this one and don’t have a demo form, but will walk you through some example code below. Note that FormAssembly field values are not related to the above demo form. In this case, I want a single discount code “TEST” to simply waive all of my payments. There’s no need to calculate an amount, but I want to use a checkbox to control whether or not payment information is shown.
The first thing you’ll notice is that everything’s wrapped in:
window.onload=function() {. . .}
Code embedded on the form will be run by your browser when the page loads, and then again if it’s explicitly instructed to do so. This intro ensures that the browser waits until everything has fully loaded before proceeding through the rest of the code. This is really important because it’s only going to evaluate the code once, and needs to be able to find the elements it’s going to interact with on that first pass.
The next two variables should look familiar, but you’re looking for both the discount code field as well as the checkbox field:
var code = document.getElementById('tfa_2238');
var checkbox = document.getElementById('tfa_2240');
This upcoming bit can be used in place of FormAssembly calling the function. It adds what’s called an “event listener” to the discount code field, and then creates a function to run any time a change in that field is detected. So if you type “TEST” into the discount field, the event listener fires, kicking off an unnamed function to evaluate whether the word TEST is in that field, and set checkboxes accordingly.
The last thing to be aware of is that, as mentioned above, some payment processors will run into trouble if fields populating them are hidden. Stripe is forgiving, but I know for sure that iATS ACH payments must have “Account Type” defined, so if you hide that field using this technique it’s necessary to set up a helper field to set a default value and pass that into the connector if the master Account Type picklist is hidden.
If you’ve come this far, you’ll be able to figure that part out :)